Yes, I'm afraid I'm in full Christmas card swing now... and it's been really lovely to get time to sit and make some, and also share my makes on here with you all.
So, what have I got to share with you all today? Well, it's this sweetheart here. The cutest little Angel there ever was. You can paper piece her, stamp and colour her, doodle in her, the choice is entirely upto you.
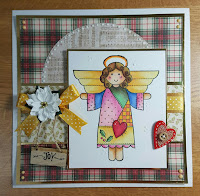
But on this card below, I chose to colour her in very simply using my new Colourista pens and pencils - and as you can see, they work amazingly well.

There are a few different things I've used on this card, and I will be sure to list them at the end of the post.

These fab little sentiment tiles would have been so easy to make had I thought about it, but I didn't, so a random purchase a while ago from Hobbycraft bought them home with me, ready for that perfect card.

So here she is - my little Angel, in all her finery. I will list all details at the end. But as you can see, the base colouring was done by stamping in Momento, as I was using permanent colours to colour in.
I coloured in using the Spectrum Noir Colourista pencils and pens. I found the pens to be lovely with the brush nib - very precise. And then topped it up with the pencils too to deepen the shades.

On this pic, you can see where I opted to use the foils that I recieved from Stix 2. These are nice and so easy to use too.... and lovely to enable you to add a bit of luxury.
So - here's your step by steps etc.
- Take your 8" x 8" card and cut some gold mirror card and patterned paper slightly smaller in layers using your Layer Perfect tool. Stick these together and attach to the card blank.
- Take a contrast paper and cut out with a circle using your Layer Perfect tool too. Really easy to do this!
- Cut a strip of gold mirror card to around 2" wide x 7.25" long. Cut a piece of patterned paper to 1.75" wide x 7.25" long and stick together. Wrap a length of ribbon around the whole piece and then attach to the card.
- Stamp your image using Momento Tuxedo Black and colour in with your chosen pens or pencils. Add some sparkle with your Sakura pens.
- If you take your Stix 2 2 in 1 glue pen, draw around the pieces you want to foil and leave to go clear. (It goes on blue - permanent adhesive, dries clear - temporary adhesive) Then pop your foil sheet over the top and rub over to adhere the foil to the glue.
- Cut out leaving a small border, then layer onto a piece of mirror card. Trim to leave a small border. You can measure this very easily using the Layer Perfect.
- Attach the angel topper to your card using Stix 2 silicone adhesive. *I opted to use silicone because you have different depths underneath the topper, so the silicone will adjust the height accordingly*
- Finish your card by adding a bow to match your ribbon, a central flower and a board sentiment. I also added a wooden heart and some pearl drops around the design.
I hope the steps make sense... really, you can just have a play with the topper once you have coloured her in, or paper pieced her. She will look beautiful whichever way you play with the stamp.
Here are the bits I've used in my card. I would love to see what you have made... please share! xxx
SHOPPING LIST
Stix2 S57321 Layer Perfect Tool
Stix2 S572269 Tape Runner
Stix2 S57109 Transfer Foil
Stix2 2 in 1 glue pen
Stix2 S57100 Silicone Adhesive
Woodware FRS223 Patch Angel stamp
Sakura Stardust pens
Colourista pens and pencils
Momento ink - Tuxedo Black (if using alcohol pens. Stazon if watercolouring)
Dovecraft Winter Blooms paper pack
Hobbycraft Mini Christmas Signs
Hobbycraft Wooden Heart Topper
No comments:
Post a Comment